SMF installing check list.
1. Check Client Requirements
2. Check Server Requirements
3. Check Server Recommendations
4. Obtain SMF
5. Upload SMF
6. Run the SMF Installer
7. Using Webinstall
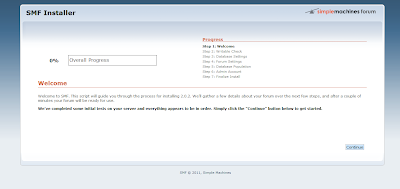
Now you're in the first page of SMF installer from localhost.
STEP 1 :: WELCOME
STEP 2 :: WRITABLE CHECK
to work manually, Some files need to be writable for SMF to work properly. This step allows you to let the installer make them writable for you. However, in some cases it won't work - in that case, please make the following files 777 (writable, 755 on some hosts)
Used user dora in my linux. i will trying to start writable to all data in the list above.
[dora@localhost smf]$ chmod 777 attachments
[dora@localhost smf]$ chmod 777 avatars
[dora@localhost smf]$ chmod 777 cache
[dora@localhost smf]$ chmod 777 Packages
[dora@localhost smf]$ chmod 777 Packages/installed.list
[dora@localhost smf]$ chmod 777 Smileys
[dora@localhost smf]$ chmod 777 Themes
[dora@localhost smf]$ chmod 777 agreement.txt
[dora@localhost smf]$ chmod 777 Settings.php
[dora@localhost smf]$ chmod 777 Settings_bak.php
when you do this steps, as you can see, writable file will be gone from the list. But if you go to smf file in your server, you can see the writable files will be auto highlight in there.
Now you're in the STEP 3 :: DATABASE SETTINGS
FIRST, you must make sure your mysql is ready.
cmd:: [root@localhost ~]# mysql -u root
        mysql> show databases;
        mysql> use mysql;
        >> ERROR 1044 (42000):Access denied for user ''@'localhost' to
           database 'mysql'

*** this is because i got something wrong with my mysql/database.

       [root@localhost ~]# /sbin/service mysqld stop
       [root@localhost ~]# mysqld_safe --skip-grant-tables &
       [root@localhost ~]# mysql -u root
         mysql> show databases;
         mysql> use mysql;
         mysql> update user set password=PASSWORD("123456") where
                User='root';
         mysql> flush privileges;
         mysql> \q

       [root@localhost ~]#  /etc/init.d/mysqld stop
       [root@localhost ~]#  /etc/init.d/mysqld start

then reload my phpadmin. user :: root / pass :: 123456
>> #1045 - Access denied for user 'root'@'localhost'(using password:YES)

*** this is because i still got something wrong with my mysql/database.

        [root@localhost ~]# cat /etc/sysconfig/selinux
        [root@localhost ~]# chkconfig --list |grep restorecond
        [root@localhost ~]#  netstat -tanp |grep 3306
        [root@localhost ~]# mysql -u root -p
           Enter password :      (password : 123456)
           >> ERROR 1045 (28000):Access denied for user 'root'@'localhost
              '(using password: YES)
        [root@localhost ~]# mysql -u root
           mysql> show databases;
           mysql> \q

        [root@localhost ~]# mysqladmin -u root password 123456
           >>mysqladmin: Can't turn off logging; error: 'Access denied;
             you need the SUPER privilege for this operation'
        [root@localhost ~]# mysqladmin -u root -p'123456' password 1234
           >>mysqladmin: connect to server at 'localhost' failed
        [root@localhost ~]# mysqladmin -u root -p'123456' password 123456
           >>mysqladmin: connect to server at 'localhost' failed

*** this mean i cant used this mysqld. So i have to delete it and install
    it back one more time.

        [root@localhost ~]# rpm -e mysql-server-5.1.66-1.el6_3.i686
        [root@localhost ~]# rpm -qa |grep mysql-server
        [root@localhost ~]#  ls -l /usr/lib/mysql/

****    yum install mysql-server
        [root@localhost ~]# /sbin/service mysqld start

** the results is still same.

        [root@localhost ~]# yum remove mysql mysql-libs mysql-server

****    yum install  mysql mysql-libs mysql-server  phpmyadmin
        [root@localhost ~]# /sbin/service mysqld start

** when the results still same. mean i still didnt have 'mysqld' in show
   database mysql.

****    yum install mlocate
        [root@localhost ~]# yum remove mysql mysql-libs mysql-server

        [root@localhost ~]# updated.
        [root@localhost ~]# locate mysql'then the history of mysql appear
        [root@localhost ~]# rm -rf /var/lib/mysql/
        [root@localhost ~]# updatedb
        [root@localhost ~]# locate mysql
        [root@localhost ~]#  rm -rf /var/log/mysql/
        [root@localhost ~]#  rm -rf /var/log/mysql*
        [root@localhost ~]#  rm -f/root/.mysql_history
        [root@localhost ~]# updatedb(now see the different of ls
                                     files left.)

** just delete the files related.

****    yum install  mysql mysql-libs mysql-server  phpmyadmin
        [root@localhost ~]# /sbin/service mysqld start
        [root@localhost ~]# mysql -u root
           mysql> show databases;
           mysql> \q

        [root@localhost ~]# cat /etc/httpd/conf.d/phpmyadmin.conf
           = edit file deny to allow from all.
           = nano -w /usr/share/phpmyadmin/config.inc.php

                  $cfg['blowfish_secret'] = ''; (fill in the blank)
                  $cfg['blowfish_secret'] = 'airbatucampur';

        [root@localhost ~]# apachectl restart

** When everything seems oke now... go back to shell.

         [root@localhost ~]# su - dora
         [dora@localhost ~]$ pwd
            >> /home/dora
         [dora@localhost ~]$ ls
            >> BNC.docx  public_html  smf_2-0-2_install.tar.bz2
         [dora@localhost ~]$ cd public_html
            >> /home/dora/public_html
         [dora@localhost public_html]$ rm -rf smf
         [dora@localhost public_html]$ mkdir smf ; cd smf ; tar xjf
                               /home/dora/smf_2-0-2_install.tar.bz2

** new URL : http://192.168.56.10/public_html/smf/install.php
** Now focus to STEP 3. Database Settings.
    - Go to phpmyadmin
    - login root no password.
    - MySQL > db > Browse > Insert
      ** host = localhost
      ** smf_db = name_db
      ** user = dora
      ** click YES for the top six option (from select_priv until
         drop_priv & alter-priv [Y])
      ** save.
    - MySQL > user > Browse > Insert
      ** host = localhost
      ** user = dora
      ** password = '' (my password)
         noted : in the back choose 'choose password'
      ** save.
    - click HOME.
    - database name :: smf_db -> create.
    - click Reload privileges. "The privileges were reloaded suc.

    - in SMF database settings.
    - fill in the blank.
    - username :: dora
    - database name :: smf_db
    - table prefix :: smf_ <- let it be.
    - server :: localhost
** NOTED (in addition)
checking for mysql/httpd

     cmd::
     [root@localhost ~]# chkconfig --list |grep mysql
     >> mysqld  0:off 1:off 2:off 3:off 4:off 5:off 6:off

     = it's mean your mysqld wont start in boot time.
       changed it to autostart on boot.

     [root@localhost ~]# chkconfig mysqld on
     [root@localhost ~]# chkconfig --list |grep mysql
     >> mysqld  0:off 1:off 2:on 3:on 4:on 5:on 6:off

     [root@localhost ~]# chkconfig --list |grep httpd
     >> httpd  0:off 1:off 2:on 3:on 4:on 5:on 6:off

     = httpd already auto on while boot.
STEP 4 :: FORUM SETTINGS
STEP 5 :: DATABASE POPULATION
STEP 6 :: ADMIN ACCOUNT
STEP 7 :: FINALIZE INSTALL
** it's done for now. :)


Thanks a bunch for sharing this with all folks you actually know what you are talking about! Bookmarked. Please additionally seek advice from my website =). We could have a hyperlink trade arrangement among us.
ReplyDeleteCreate a MySQL database.